

You can use image processing software such as Photoshop, Paint Shop Pro etc., to optimise your image files for the web. However, if you are unfamiliar with this type of application, or you don’t have suitable software installed on your computer, you can use the image compression feature in Microsoft Word and PowerPoint (for PC & Mac users) or Pages (for Mac users) – this will compress the images for you.
We recommend that you save a copy of your document before compressing the images as, if you are not satisfied with the image quality after compression is applied, the process is irreversible.
Please select the guide below based on your system and software.
Microsoft Office for PC
Instructions are provided for Microsoft Office 365 and 2019. If you are using a different version of the software the steps to follow may be slightly different.
Microsoft Office 365 and 2019
- Insert the images into your document as usual, and save the file.
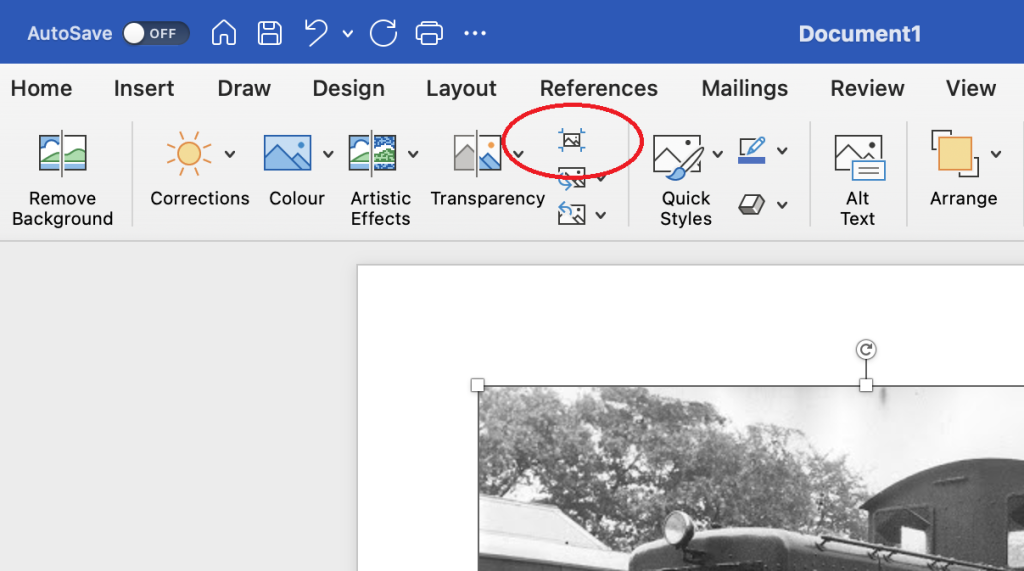
- Click on any image in your document.
- Click on the Picture Format (Office 365) or Format (2019) tab.
- Click on the Compress Pictures icon, as indicated below.

- Select the options in the Compress Pictures menu as follows:
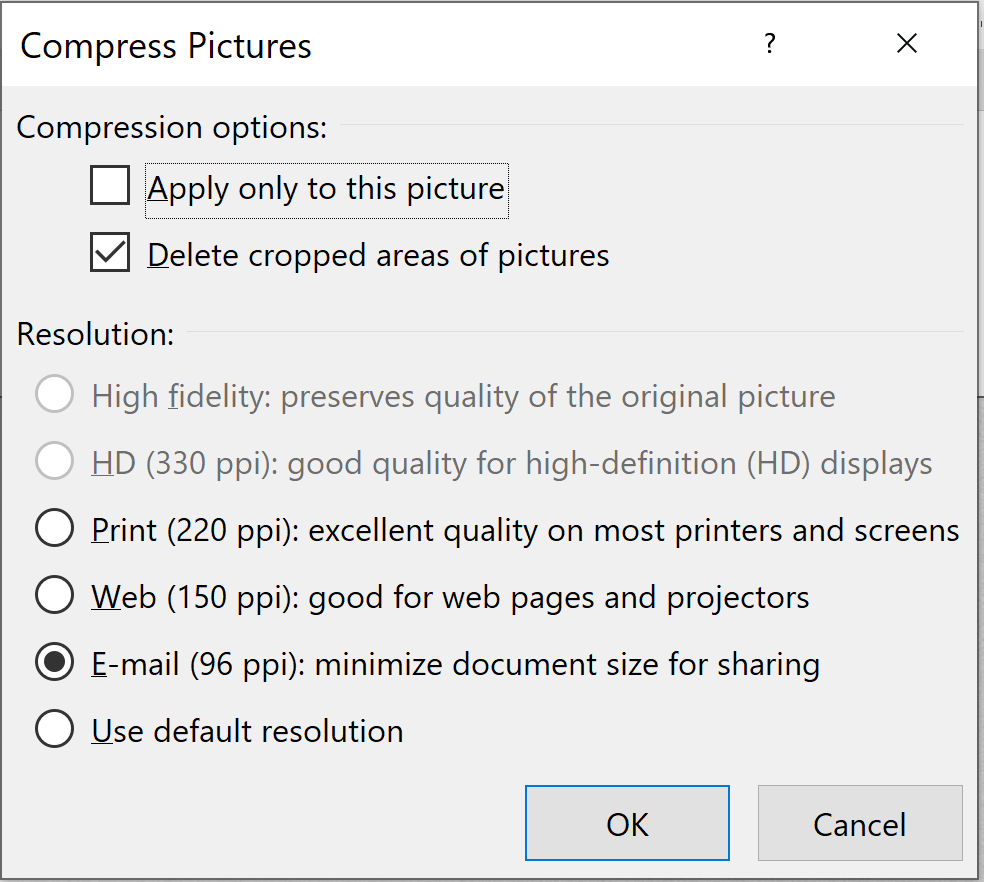
- To compress all images in your assignment, untick the option Apply only to this picture.
- Select Delete cropped areas of pictures.
- Select E-mail (96 ppi): minimize document size for sharing.
- Click OK.
If you are happy with the image quality, save the document and check the size again. The file will have reduced in size and you should now be able to submit your assignment. If you still get a ‘file is too big’ error message you may wish to evaluate your use of images in the assignment.
Microsoft Office for Mac
Please note that the instructions below are for Microsoft Office 2016 and 2011 for Mac. If you are using a different version of the software the steps to follow may be slightly different.
Insert the images into your document as usual, and save the file.
Click on any image in the document.
- Click Compress, circled above.
- Select the options in the Reduce File Size menu as follows:
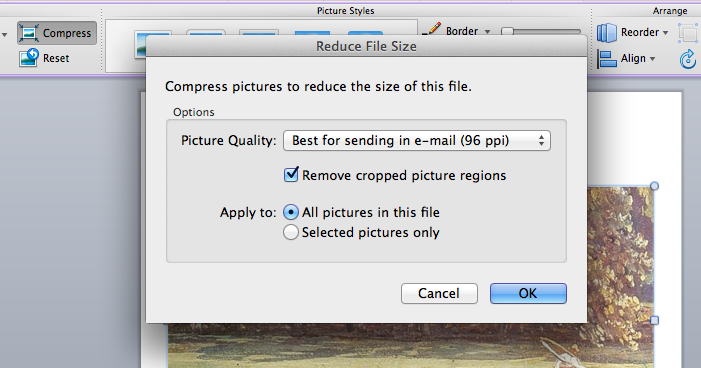
- Picture Quality: select Best for sending in e-mail (96ppi).
- Tick the box Remove cropped picture regions.
- Apply to: select All pictures in this file.
- Click OK.
If you are happy with the image quality, save the document and check the size again. The file will have reduced in size and you should now be able to submit your assignment. If you still get a ‘file is too big’ error message you may wish to evaluate your use of images in the assignment.
Pages for Mac
We do not currently accept .pages documents for submission, but if you have prepared your work in pages it is simple to convert the document to a .docx file on your Mac. You will need to compress images first and then convert the compressed document by following our guidance Converting a .pages file to a .docx file for submission.
To reduce the image size:
- Go to File.
- Click Advanced.
- Click Reduce file size.
If there are any images which can be compressed Pages will indicate them. If no images can be compressed you will see a message appear letting you know that all images are at their optimal size.
If you are happy with the image quality, save the document and check the size again. The file will have reduced in size and you can now convert your document to a .docx file.
You must be logged in to post a comment.