My file is too large to submit – what do I do?

Follow the steps outlined below to check your file size, and try a few ways to reduce it. You can check the maximum file size permitted for your assignment in your assignment instructions.

How do I check my file size?

Windows

Find your Word document on your device. Without opening it, use your mouse to hover over the document name or icon and right click. In the menu that opens choose Properties. Under the General tab you will see Size.

Mac Os

From the desktop click Go. Find your assignment, place the cursor on it and without opening it hold down control and click. Select Get info. You will see your document size on the top right of the Get Info panel.

How do I reduce the file size?

There are 3 areas you can investigate in order to reduce your file size: checking your word count, compressing images, and saving your file as a pdf. We provide guidance for each one below.

We recommend that you save a copy of your document before attempting any manipulation, so, if you are not satisfied with the result of your experimentation, you are able to return to the previous version. 

Check your word count

If you are on an award-bearing course and producing a large piece of work, check your word count, and make sure it is in line with the assignment instructions. You can find information on assignment guidelines and policies in your handbook. As a general rule in academic essays the in-text references count towards the word count, but bibliographies and annex documents do not. When in doubt, check with your tutor via one of the forums in your course.

Compress images

If your word count is not at fault but you have included pictures in your document you may well need to reduce their size.

You can use image processing software such as Photoshop, Paint Shop Pro etc., to optimize your image files for the web. There are also some free online sites for compressing images which will do the same job. You can find these by searching for phrases such as ‘make an image smaller’ .

If you don’t have image processing software and would prefer not to use an online tool for individual images, you can use the image compression feature in Microsoft Word and PowerPoint (for PC & Mac users) or Pages (for Mac users) – this will compress the images for you. You can find step-by-step instructions on the Compressing images to reduce file size page.

Save as PDF

If you have tried making the images smaller you may want to use Save As to save a copy of your document as a PDF.

If you have tried compressing your images and saving your document as a PDF and your file is still too large you may wish to try searching online for a free tool to compress your PDF.

If you’re still unable to make your file small enough to submit please contact tallithelp@conted.ox.ac.uk.
I am having difficulty accessing some resources

Most students find that they can access all of their course resources with no trouble. If you do have trouble accessing a resource the information given below should help to resolve the problem. Please also see our current System requirements to check that your system and software are up to date.

I can't view videos


You may want to check the speed of your internet connection, which you can do here.

If you’re not already using Google Chrome or Mozilla Firefox as your browser it would be worth trying one of these, you can download them here:

You may also find one of the following browser support pages useful.

If you’re unable to resolve the problem please contact us making sure to let us know where the video is in your course (unit and section).

I can't read a PDF


Most of our text-based content is presented in a standard web format (HTML) which can be displayed by any web browser. When students are required to download and print out many pages of text (e.g. extracts from books), it is more convenient to deliver this content in the Adobe Portable Document Format (PDF).

If you are unable to view the PDF documents in your course materials, visit the Adobe download page and follow the instructions for installing the latest version of the PDF reader plug-in.

If you are still struggling to access some resources please contact us

Compressing images to reduce file size

You can use image processing software such as Photoshop, Paint Shop Pro etc., to optimise your image files for the web. However, if you are unfamiliar with this type of application, or you don’t have suitable software installed on your computer, you can use the image compression feature in Microsoft Word and PowerPoint (for PC & Mac users) or Pages (for Mac users) – this will compress the images for you.

We recommend that you save a copy of your document before compressing the images as, if you are not satisfied with the image quality after compression is applied, the process is irreversible.

Please select the guide below based on your system and software.

Microsoft Office for PC

Instructions are provided for Microsoft Office 365 and 2019. If you are using a different version of the software the steps to follow may be slightly different.

Microsoft Office 365 and 2019

  • Insert the images into your document as usual, and save the file.
  • Click on any image in your document.
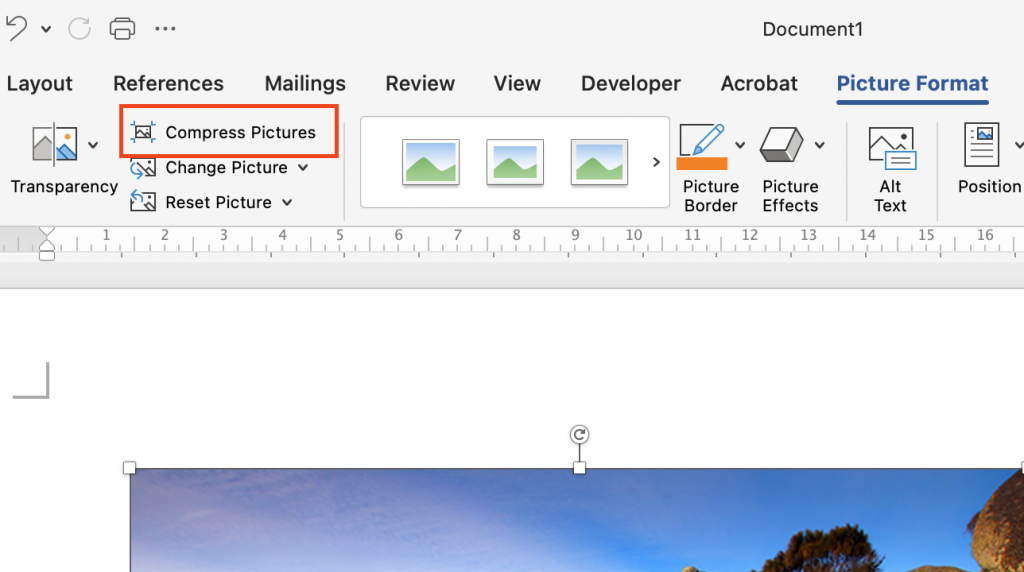
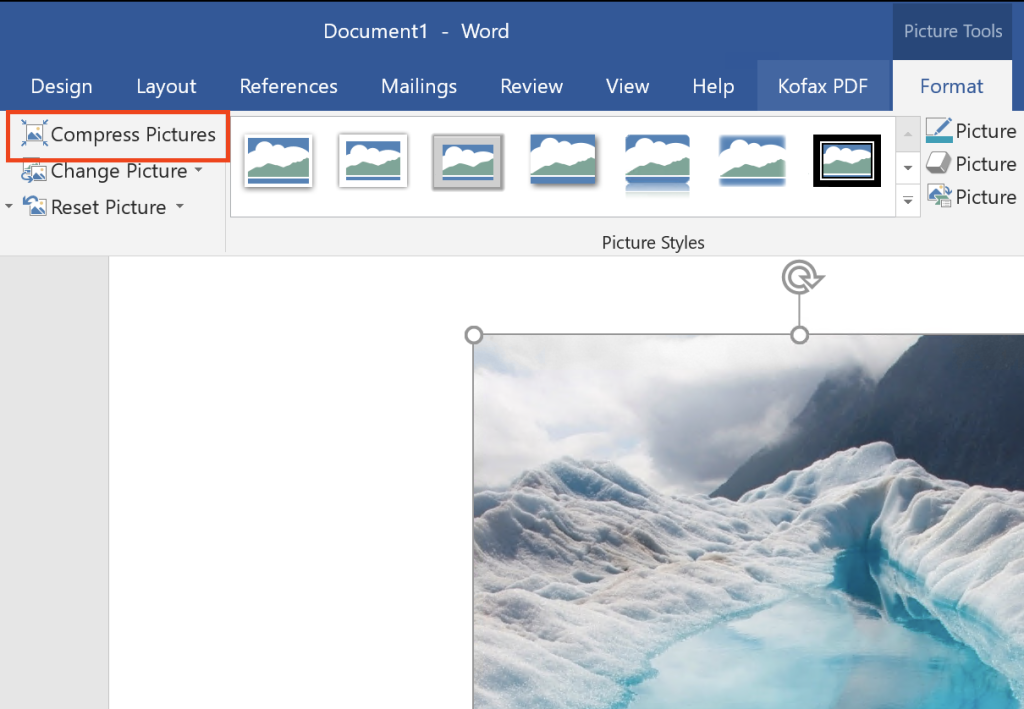
  • Click on the Picture Format (Office 365) or Format (2019) tab.
  • Click on the Compress Pictures icon, as indicated below.
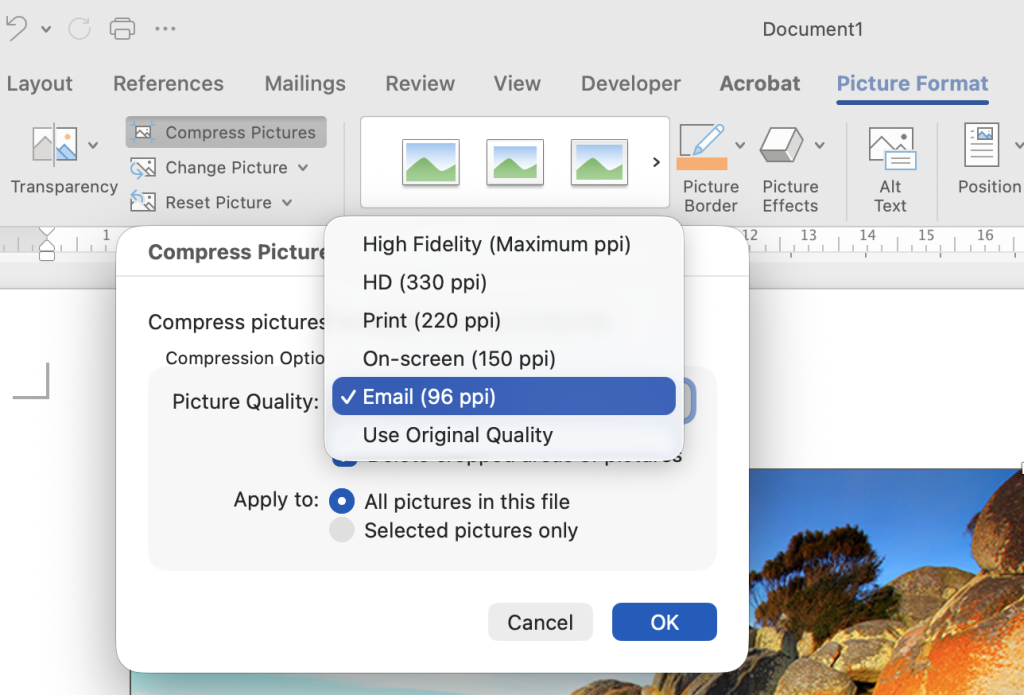
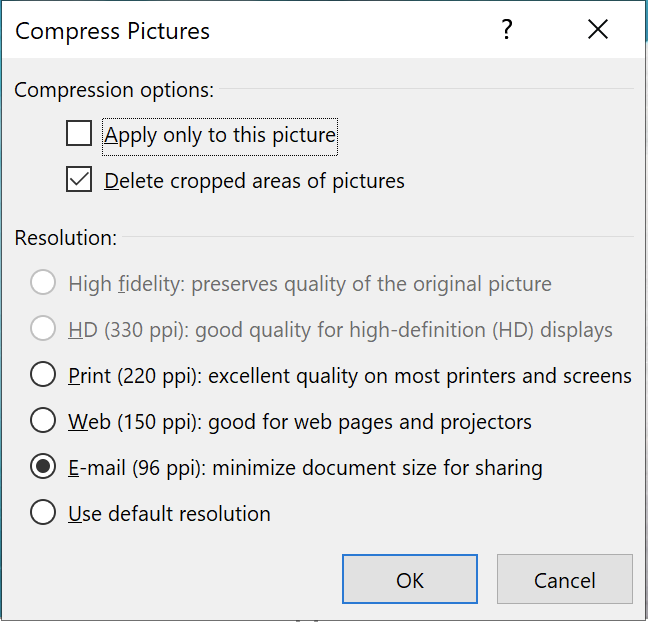
  • Select the options in the Compress Pictures menu as follows:
  • To compress all images in your assignment, untick the option Apply only to this picture.
  • Select Delete cropped areas of pictures.
  • Select E-mail (96 ppi): minimize document size for sharing.
  • Click OK.

If you are happy with the image quality, save the document and check the size again. The file will have reduced in size and you should now be able to submit your assignment. If you still get a ‘file is too big’ error message you may wish to evaluate your use of images in the assignment.

Microsoft Office for Mac

Please note that the instructions below are for Microsoft Office 2016 and 2011 for Mac. If you are using a different version of the software the steps to follow may be slightly different.

Insert the images into your document as usual, and save the file.

Click on any image in the document.

  • Click Compress, circled above.
  • Select the options in the Reduce File Size menu as follows:
  • Picture Quality: select Best for sending in e-mail (96ppi).
  • Tick the box Remove cropped picture regions.
  • Apply to: select All pictures in this file.
  • Click OK.

If you are happy with the image quality, save the document and check the size again. The file will have reduced in size and you should now be able to submit your assignment. If you still get a ‘file is too big’ error message you may wish to evaluate your use of images in the assignment.

Pages for Mac

We do not currently accept .pages documents for submission, but if you have prepared your work in pages it is simple to convert the document to a .docx file on your Mac. You will need to compress images first and then convert the compressed document by following our guidance Converting a .pages file to a .docx file for submission.

To reduce the image size:

  • Go to File.
  • Click Advanced.
  • Click Reduce file size.

If there are any images which can be compressed Pages will indicate them. If no images can be compressed you will see a message appear letting you know that all images are at their optimal size.

If you are happy with the image quality, save the document and check the size again. The file will have reduced in size and you can now convert your document to a .docx file.

Files App on an iPad

You can compress your images before adding them to your document using the Files App on your iPad.

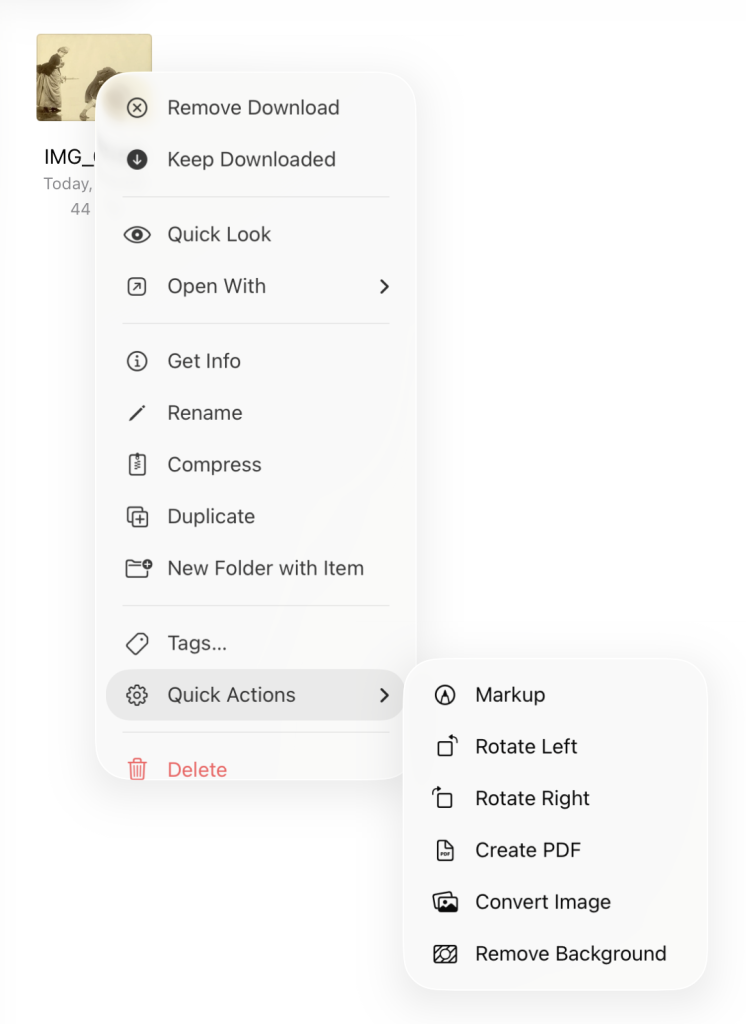
  • First, find your image in the Files App and long press it.
  • From the menu that opens choose Quick Actions > Convert Image
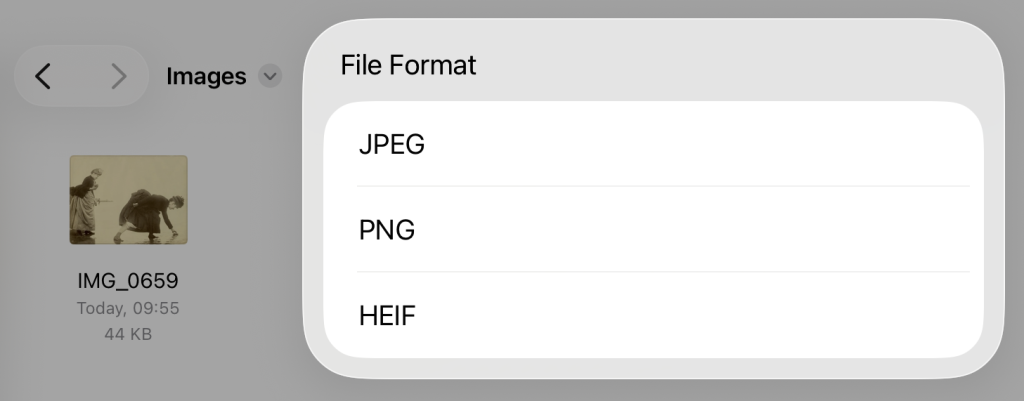
  • Choose a File Format (you could choose the existing format)
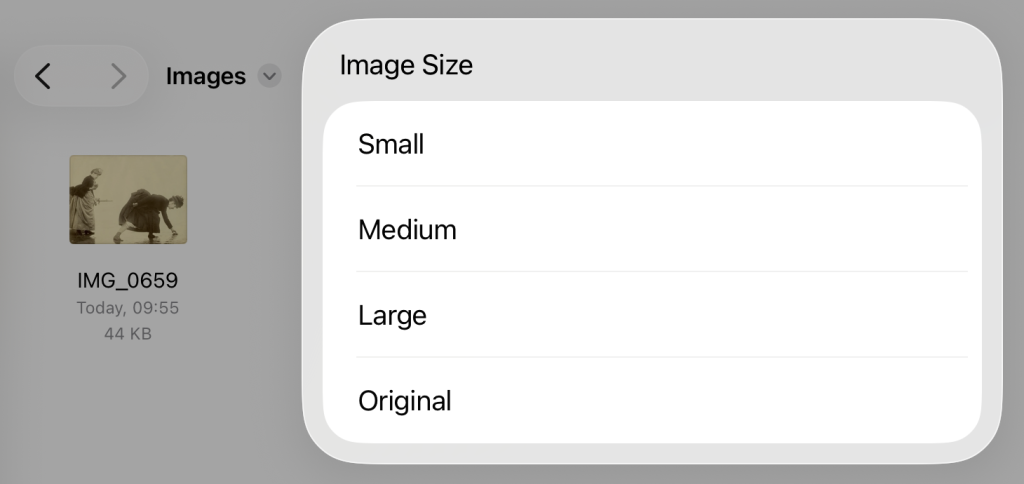
  • Choose an Image Size. You may need to experiment with sizes to see if you’re happy with the compressed image.